

How to print photos
1) Click on the Darkroom Icon located at the bottom of the screen in the task bar.
2) If the login window pops up, password is express and click Login

3) Once in Darkroom, click on the Photo Library tab located at the bottom.
4) In the PhotoLibrary located in the left column, expand the Portrait tab by clicking the “+” sign (1) then click on the 030424 tab (2)

5) This window will open in the center and this is where you will drag photos into that need to be printed (1). Located in the right column is the print sizes (2). When you’re ready to print, you are going to click and drag images into window 1.

6) When this prompt pops up, just click Yes

7) Click on the photo you want to print and click photoworkshop located at the bottom of the page.
8) The left column is the filmstrip where you can also click and choose photos (1). The main window will show you how exactly how the photo will print out (2). You must change your aspect ratio depending on what size you are printing. The only 2 sizes you will be choosing from will be 5x7 or 8x10 (3).

9) Example 1 is an 8x10 aspect ratio. Example 2 is a 5x7 aspect ratio. Notice how much of the shoulders got cut off or how much skinnier the crop frame became in example 2/5x7 aspect ratio. These are the differences between the 8x10 and 5x7 aspect ratios.
Here is a cheat guide to determine what aspect ratio size you should choose when printing certain sizes:
8x10 = 8x10 aspect
5x7 = 5x7 aspect
4x5 = 8x10 aspect
Wallets = 5x7 aspect

10) This only applies when you have the 5x7 aspect selected. If you need to center your image, you can either click and drag the image or use the arrow keys on the keyboard to make those adjustments. See examples below. The left photo is the original and the photo on the right is centered using the methods mentioned earlier.


11) When printing an 8x10 or 4x5 print, set your aspect to 8x10 FIRST (1). Then click on the photo you want to print. In the right column, you will see the print sizes (2). Same rules apply when you are printing 5x7 or Wallets, but make sure to change your aspect to 5x7 for those prints

Print sizes explained:
1 - 8x10 = one 8x10 print
2 - 2-5x7’s = two 5x7 prints
3 - 4-4x5’s = four 4x5 prints
4 - 8 Wallets (2-5x7) = two 5x7 prints with 4 wallets on each sheet
12) Always make sure that the correct package group is selected when printing orders. For studio orders, use the Standard package group. To check that, on the bottom right corner of the screen, click on add package (1), Change Default Group (2), then click on Standard (3). Once the package group is set, click on the print size you need to print (8x10 or 4x5) and it will pop up in the right column


This shows you what photo(s) and what size(s) you have ready to get sent to the printer
13) When you are ready to send the order to the printer, click on place order (1) which is in the same column. A summary screen will pop up. Click on print located at the bottom of the screen (2)

14) This message will appear shortly after. This means that the printer is just heating up and will start printing once it comes to temperature.
DO NOT CLICK ANYTHING

troubleshooting
checking if your order went through
Method 1:
1) One indication that your order got sent to the printer would be the “Adjusting heater unit temperature” message (as pictured above this with the yellow box).
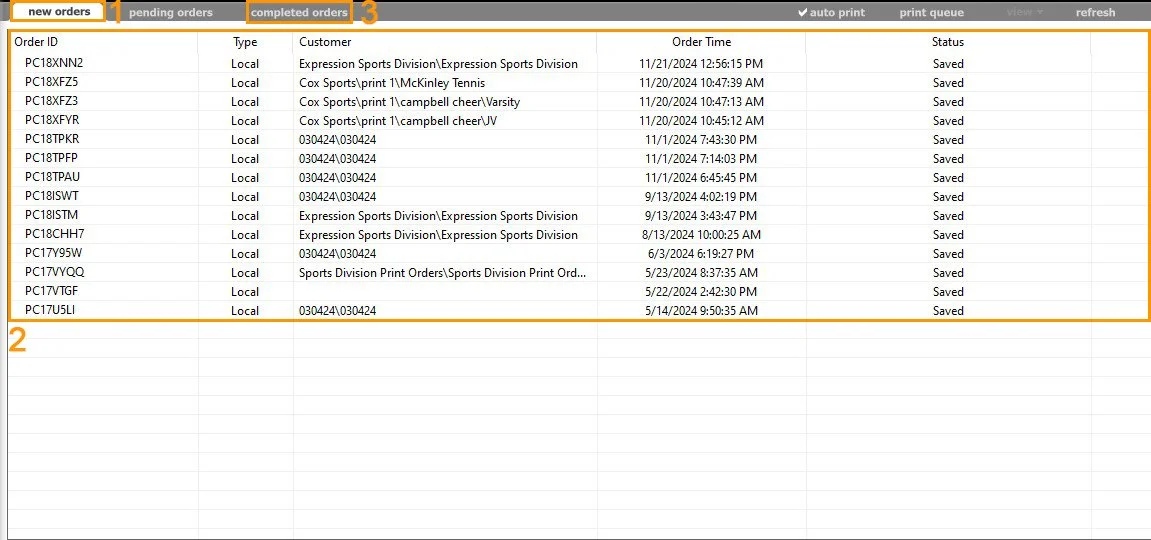
2) Another indication would be to click on the orders tab located at the bottom of the screen
3) In this window, you are going to click on the new orders tab at the top (1). You will then see your order being processed and it will say something like 2 of 4 printed (just like the example below on the right). If you don’t see your order anywhere in the main window (2), that means your order went through and it moved to the completed orders tab (3)
Method 2:
1) Another way to check is to click on the orders tab located at the bottom of the screen
2) This window will pop up. Click on completed orders (1). Your most recent order should be at the very top of the list (like the one highlighted blue in the picture below) (2)

3) At the bottom, you can even click on the purple highlighted text to see the actual photo sent to the printer

if your order didn’t go through
1) If you see this message as you are going through the checks above, this means your order didn’t go through.

2) To fix this, click on the setup tab located at the bottom.
3) Double click on Fujifilm DL650 (192.168.1.115) 1 printer

4) This printer setup window will pop up and make sure the driver (1), IP address (2), and paper magazine (3) are enabled exactly like the example below. When everything is correct, click OK (4)


Paper Sizes Explained
Here’s a cheat guide to paper sizes:
127.0mm = 5 inch paper
203.0mm = 8 inch paper
254.0mm = 10 inch paper
The paper width (3) is measured in millimeters (mm). Mag A reads 127.0mm and Mag B reads 254.0mm. This means Mag A has 5 inch paper loaded and Mag B has 10 inch paper loaded. 5x7, 4x5, and Wallet prints are printed on the 5 inch/127.0mm paper. 8x10 prints can be printed on either 10 inch/254.0mm or 8 inch/203.0mm paper.
These are the only 3 paper sizes we print on unless stated otherwise.
5) When this prompt pops up, just click Yes to resume printing

If you accidently enter the wrong quantity for prints
1) In this example, it shows that there is a quantity of (4) 8x10’s (1). To fix this, you double click on the bubble located next to the quantity (1). The bubble will change into arrows. Use these arrows to change the quantity desired (2). In this example (3), it shows the quantity changed back to a single 8x10.


Example