

Printer Start Up
[Sean’s Computer Only]
Before printer start up, let computer warm up for 5 minutes before proceeding
1) Click on the Maintenance Utility icon located on the bottom in the task bar
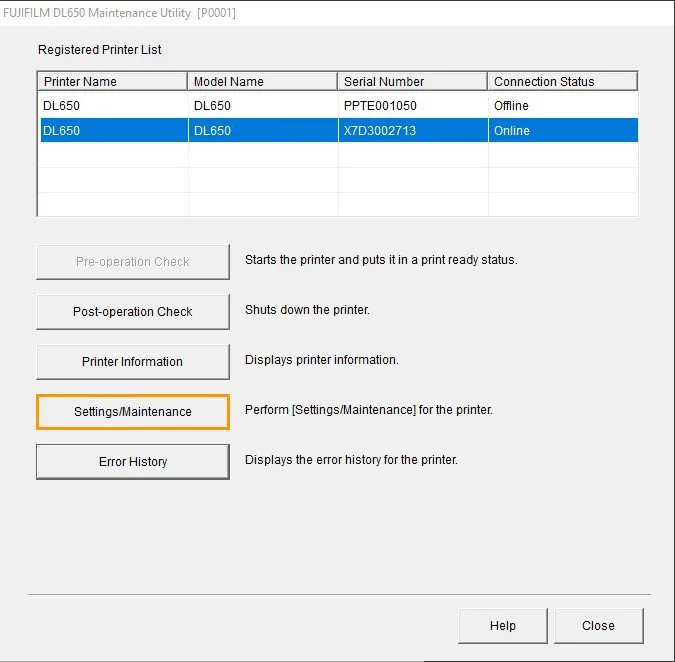
2) Click on printer X7D3002713 and Pre-operation Check

3) This window will pop up. Click OK and it should resume loading

4) If this window pops up, just click OK and it will resume loading. It’s just notifying you that one of the inks are starting to run low. You will still be able to print with the remaining ink left until the ink fully runs out.

5) Once printer is done with the Pre-operation Check, it will show that it’s online

6) Now click on the Darkroom icon on the bottom of the screen located in the taskbar
7) Password is express and click Login


8) Click setup on the bottom (1), click Printer Options in the left column (2), and double click on Fujifilm DL650 (3)

9) Enable Fujifilm DL650 driver should be checked (1), Printer IP Address should be set to 192.168.1.115 (2), Mag A (127.0mm) & Mag B (254.0mm) should be checked (3), then click OK (4).

Paper Sizes Explained
Here’s a cheat guide to paper sizes:
127.0mm = 5 inch paper
203.0mm = 8 inch paper
254.0mm = 10 inch paper
The paper width (3) is measured in millimeters (mm). Mag A reads 127.0mm and Mag B reads 254.0mm. This means Mag A has 5 inch paper loaded and Mag B has 10 inch paper loaded. 5x7, 4x5, and Wallet prints are printed on the 5 inch/127.0mm paper. 8x10 prints can be printed on either 10 inch/254.0mm or 8 inch/203.0mm paper.
These are the only 3 paper sizes we print on unless stated otherwise.
Nozzle check - detect clogging
1) Click on the Maintenance Utility icon located on the bottom in the task bar
2) Make sure printer X7D3002713 is highlighted and online. Click on Settings/Maintenance
3) Expand (click on the “+” sign) the 03.Print Head Adjustment/Maintenance if it doesn’t look like the picture below. Click on 0312.Nozzle Check (1). Then click Detect Clogging (2)

4) If all nozzles are clean, blocks 1-6 will light up GREEN.
If the blocks light up YELLOW that means it’s a bit dirty and needs cleaning.
To clean, you check off the boxes that are dirty (1) and click Normal (2).
If blocks light up RED that means it’s really dirty and repeat steps 1 & 2 for cleaning.


5) When everything is all good, click Back
6) Then click Close. Now the printer is ready to use
nozzle check - print check pattern
1) If “Detect Clogging” method doesn’t work, click on Print Check Pattern. The printer will print a visual line pattern of all 6 nozzles to show whether it is clogged or not (1). I split the nozzles into blocks so you can visually see which nozzles correspond to which number (2). All nozzles are clean in both figures 1 and 2.


2) This image shows you how it looks like if the print out shows a clogged nozzle. As you can see, there are “holes” or “spots” on nozzle 3. To clean dirty nozzle, refer to step 4 above in nozzle check - detect clogging


Shutting Down The Printer
1) Click on the Maintenance Utility icon located on the bottom in the task bar
2) Click on printer X7D3002713 (1) and click on Post-operation Check (2)
5) Once shut down, the printer will show that it is Offline


3) Click on Start Post-operation Check
4) You are going to click the OK button 4 times and the printer will begin the Post-operation Check and shut itself down when it’s finished

3) When everything is all good, click Back
4) Then click Close. Now the printer is ready to use