

setting up photos for viewing
You will need to do the following steps for each student in Captura before allowing them to view their photos.
1) After photos are taken and synced with Captura, navigate to the school job that you’re currently working on. In this case it would be Aiea High School 2025 (1). Then click on Images at the top (2) if it’s not already selected.

2) You will see the photos of the seniors in this window.

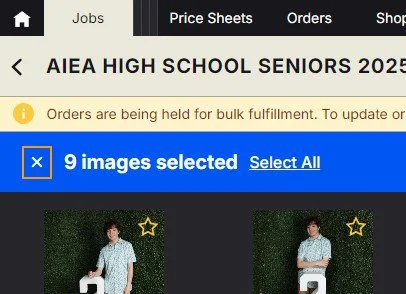
3) You’re going to search for the student you’re currently working on by typing in the name of the student (1). You can either search up the last name, first name, or both. In this case, the students name is Hayden Garcia-Mitchell (2) so searching garcia was enough to bring up all of that students photos.

4) Click on the first image and then click shift to select all images from the session. Then click download on the top right of the page.
5) Download them to the Images Drive under Senior 2026, school name, and name folder with Students last name, First name and photographer initials.
6) Click and drag the downloaded image into Lightroom and crop
Crop to 4x5/8x10, remove bad images and adjust exposure and color if needed
7) Once all images are cropped export the images to the same folder as originals and save to a subfolder called cropped
8) In captura, go back to the job and select tools in the top tool bar. Import
9) on the next window select replace images
10) Click Browse, navigate to the folder where the cropped images are stored and leave versioning on preserve existing images.
11) The images will be replaced, Click Sync
12) In the Images window search the subjects name to pull up their images, under filter click “no versions”
these images that pop up are gonna be the images that you did not keep. Select these images and click delete
13) click sync again
TROUBLE SHOOTING
If you accidentally hide a photo by mistake, you can always bring it back by clicking on the filters button (1), check off Hidden Images (2), then click X (3) in the top right corner.

8) The hidden photo will show up dark with the rest of the photos like this (1). Click on the 3 dots in the white circle (2) and uncheck “Hidden” (3). The photo will now be visible again.


13) Now you’re going to “knock out” the backgrounds on the formals. To do that, highlight all of the formal headshots that you already cropped, click on the Intelligence button (2), click on Selected (3), check off Background Extraction (4), then click Send images (5).
AFTER ORDERING
Sales must print out the invoice
1) Find the subject and images in Captura
2) Click on the images
4) If it’s a school that only requires a formal photo or a single personality, select ALL the formal/personality photos by either clicking on each one, or clicking on the first photo, then while holding the Shift key on the keyboard, click on the last photo. It should look like this after you make the selections.

5) Then click on Available for YB 1 to lock it in for when the customer makes their yearbook photo selection. The customer will only be able to choose the photos based on what you selected for YB 1. When you select that option, the button will turn blue like the example below.

6) Once you’re done setting images for YB 1, click on the X located in the top left corner to deselect the photos. Then click SYNC located in the top right corner of the window.
7) If the school also requires a personality photo for the yearbook, follow steps 4 - 6 above. The only difference is you’ll be selecting ALL the personality photos instead of the formal ones and clicking on Available for YB 2. Click SYNC located in the top right corner of the window.


8) Once you’re finished with that, click on Subjects at the top (1). Then search up the student in the search box (2).
9) When you find the student you’re currently working with, click on the name (1), click on the shopping cart icon (2), then click View in Browser (3).

10) This window will open in the web browser. Instruct the customer to type in their email (1) and then click Login (2).
11) The customer now has access to their gallery.
See Favoriting Photos to move onto the next step.