

starting/DURING the session
Here’s a step by step guide on how to start the photo session if you don’t already know how to.

1) If it’s the beginning of the day and you’re shooting the very first senior, you HAVE TO do this FIRST! On the Desktop, right click anywhere on the screen > New > click on Folder.
2) Rename the new folder to the current (today’s) date (ex: 02012025). Now that folder is set and good to go for the day.

3) Now make sure the camera is on and has the tethering cord hooked up to it (same way like shooting at the santa stand) then open up EOS Utility by double clicking on the desktop icon or the icon in the task bar located at the bottom of the screen.

4) This window will open then click Remote Shooting.

5) This window will pop up then click on the folder icon.

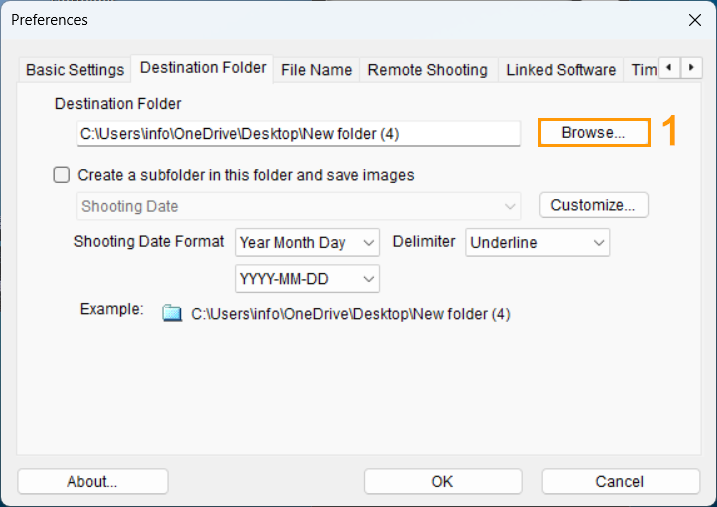
6) The Preferences window will open and the Destination Folder tab will automatically be selected. Click on Browse… (1).
7) This window will pop up. Navigate to the folder you created in steps 1 and 2 above. Just a recap, you created a folder on the desktop. When you’re in this window, you would look for Desktop (1), expand it by clicking on the little arrow on the left side of the icon (2) and you should see your folder there (3). Then click on OK (4).

8) The Destination Folder line should look similar to something like this (1). If it looks like this then you did things correctly. Then click on OK (2).

9) After that, click on the File Name tab (1), click on the dropbox and select Shooting Date+Number (2).

10) In the “Number of Digits” text box, type the number 4 (1). In the “Start” text box, type the number 1 (2). Then click OK (3). See example below.

11) Steps 1-10 should only be done on the very first appointment of the day. The rest of the appointments moving forward for the current day will be all set.
12) Then you’re going to open Captura. This is how the icon looks like.
13) Once one this page, click on Jobs (1 or 2).

14) Type in “seniors” in the search box (1) and the schools will show up as a list (2). Find the school of the student you are shooting and click on it.

15) In this example, Aiea High School 2025 was clicked on. By default, it should open to the Dashboard page (1). If it’s not, just click on Dashboard. Then you’re going to click on START SESSION (2) which is located on the bottom right of the page.

16) In the search box (1), look up the student’s name by first and/or last name. Names will pop up below the search box and you’re going to click on the correct student you’re currently working with (2). Then click on SETTINGS (3).

17) Check off the Automatic aspect ratio box (1) and click on 4:5 (8x10) (2). This is done because as you’re shooting, it will record the photos you take in that ratio.

18) Now scroll down until you find Camera Hot Folder (1) then click BROWSE…(2).

19) You are going to navigate to the folder you created in steps 1 and 2 above again. Just a recap, you created a folder on the desktop. When you’re in this window, click on Desktop (1). Click on the folder you created in the window on the right side (2). Then click on Select Folder (3) at the bottom right of the screen.

20) If you did everything correctly, the camera hot folder path should look something similar to this (1). Then click Exit (2) and now you’re ready to start shooting.

18) You will be in this window during the majority of the shoot. The pictures you shoot will populate here (1) and also a bigger preview will show here (2). After you’re finished taking pictures, click on Finish (3).

19) You’ll be taken back to this screen. Click on SYNC in the top right corner (1). It’ll look like this when it’s syncing (2).


20) When photos are done syncing it will look like this. **IMPORTANT** While syncing, make sure you wait until syncing is finished BEFORE moving on to the next appointment otherwise photos may not sync to the cloud properly.

See Setting Up Photos For Viewing to move onto the next step.